We are ready to connect VPN tunnels from your devices into a single network
All settings are carried out in two places:
- in a special section of the site after successful registration
- on your devices according to the setup instructions
Important!
Before starting the setup, you should know:
1. Addressing home network devices in the format network address / mask (for example, 192.168.0.0/24 or in another form of recording - network 192.168.0.0 mask 255.255.255.0)
2. Types of VPN protocols in your device. We support:
PPTP In two versions
- with MPPE encryption with MS-CHAPv2 authentication,
- without MPPE encryption with CHAP authentication
L2TP. Authentication Type CHAP or MS-CHAPv2
L2TP / IPsec. Authentication Type CHAP or MS-CHAPv2
OpenVPN using server certificate, login and password.
You can use any connection protocol and your tunnels will be united into a single network, regardless of the protocol used
3. The ability to support your devices DHCP client functions for receiving addresses and routes from the VPNKI server in automatic mode
For example, VPN clients of Android 6.0 or Linux do not have the regular ability to obtain addresses and routes via DHCP on tunnel interfaces, but Windows clients have this capability.
This means that for Android and Linux you will have to manually register the following routes in the connection settings:
- 172.16.0.0 / 16 to the VPNKI network (required)
- route to your remote home network (192.168.x.x / x) (if necessary)
For more details, see the relevant instructions for your devices on the site.
Start by setting up on your personal page
You need to create as many tunnels as there will be devices connecting to the system. One device - one tunnel!
In terms of our system, a tunnel is a username and password with which your device will connect to the VPNKI service.
Example. Imagine: You have two tunnels.
You plan to use the first for connecting the tablet, the second for the country router, for which there is, for example, a video surveillance server.
The second tunnel (unlike the first) also describes the addressing of the country network located behind the router. In our example, 192.168.1.0 / 24
Then your settings on your personal page should look something like this.
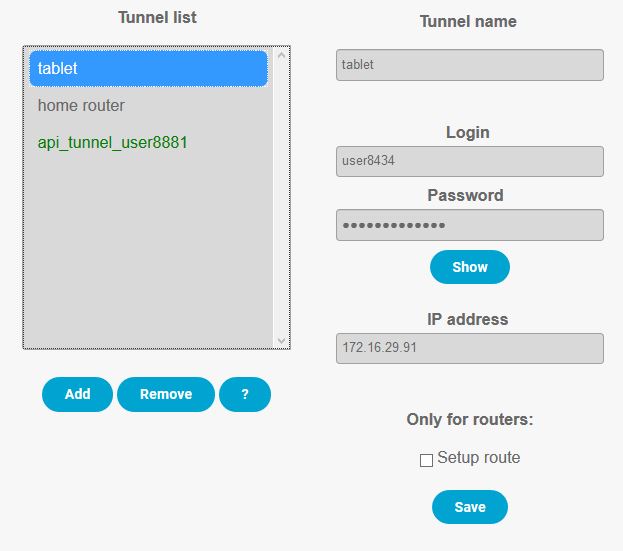
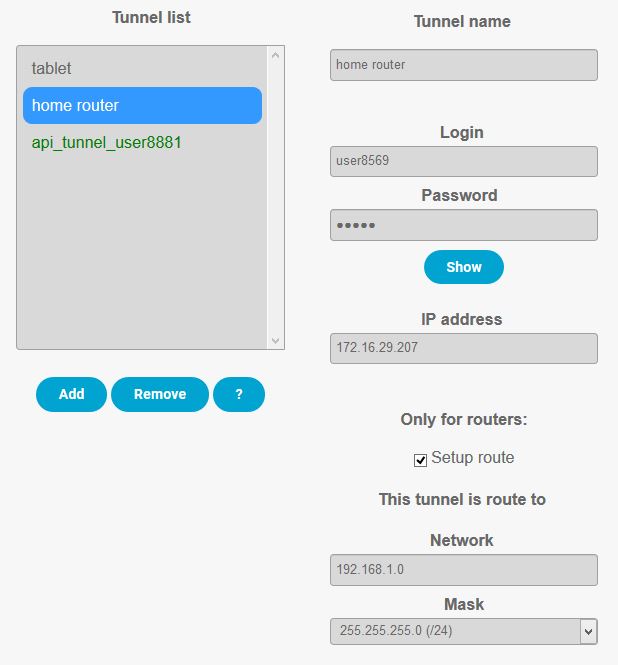
The settings shown in the example on the personal page are enough (!) for the system to start accepting VPN connections from your devices using PPTP, L2TP and L2TP / IPsec protocols.
Start of the OpenVPN process on the server
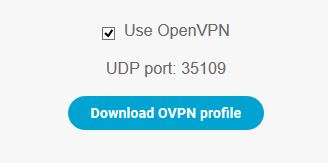
If you want to use the OpenVPN protocol (and the corresponding client software) to connect, you need to check the user’s main page. In this case, the system will generate a special settings file for you and assign a UDP port for connection.
Then you need to download the .ovpn profile and use it when connecting.
Important! Each click on OpenVPN setting checkbox is to a new generation of the .ovpn file! So download the file and DO NOT experiment with the checkmark anymore
Port on the picture 35109 is just an example, you will get yours
You can monitor the procedures for establishing connections and their completion through the site menu "Security Events", "Authorization Events" and "Connection Statistics" (available after registration).
The remaining settings are made on your devices. To do this, see the setup instructions in the appropriate section.
Important! We strongly recommend that at the first stage of using the system, DO NOT experiment with various additional functions in the "Advanced" menu. It is advisable to use them after gaining some experience with the system.
Important! Almost all the settings you make on the site will be applied the next time you connect VPN tunnels.
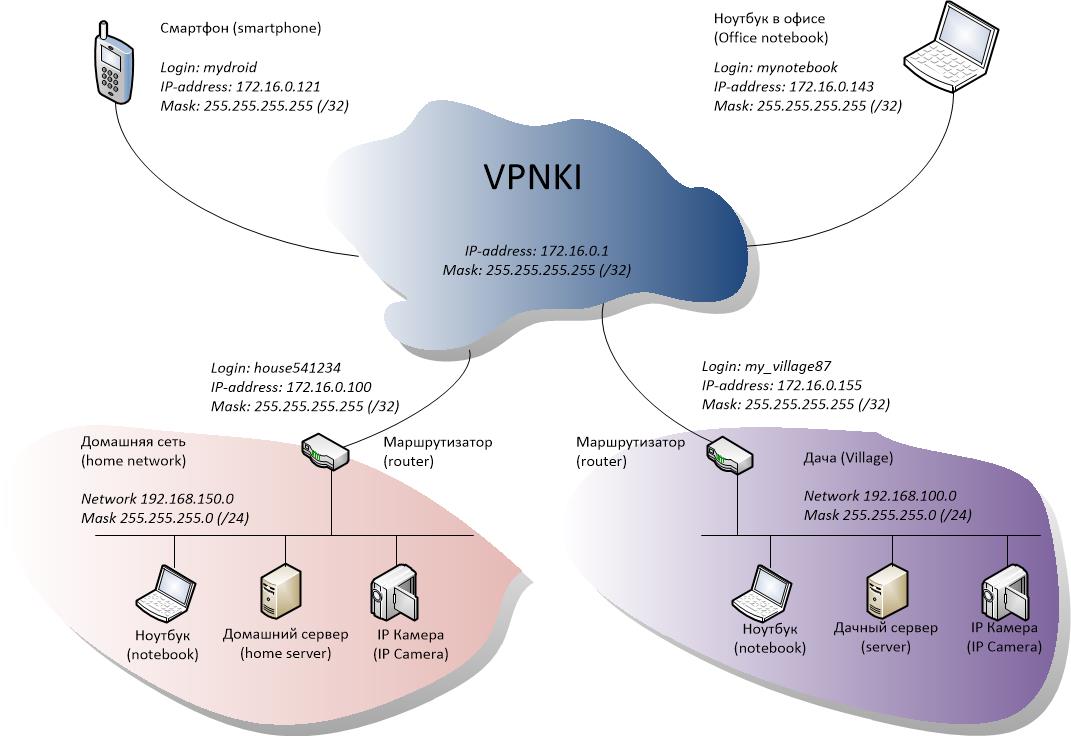
The figure shows an example of VPNKI tunnels setting page along with examples of IP addresses.